Oil Rubbed Bronze spray painted door knob
We
installed the door knob, hinges, and door stopper that we spray painted
with oil rubbed bronze spray paint. Like I mentioned before, we found
brass ones discounted and used the spray paint for the look we wanted.
:-) Here's a couple pictures!


~~~~~~~~~~~~~~~~~
It's
a little blurry in this picture, but here it is! That was also
finished last Monday. This past Sunday Will finished the door frame,
the base moulding and the inside door trim. It's coming along.

~~~~~~~~~~~~~~~
Oil Rubbed Bronze spray paint!
On
Friday we bought brass door knobs, hinges, and door stoppers, that were
discounted. On Pinterest we saw that you could buy oil rubbed bronze
spray paint to cover them.

Will
scuffed them with a metal brush and then primed them. After they were
dry I spray painted them. They look great! The picture didn't come out
the best but here's one with what we painted then one of Will drawing
out where to chisel the door for the hinge to go.


~~~~~~~~~~~~~~~
Will
has also been working on the upstairs bathroom. He built a closet
between the tub and the wall that shares the hallway. We brought our
shower curtain to the hardware store for them to match the color for
paint. They did a good job! This is our shower curtain...
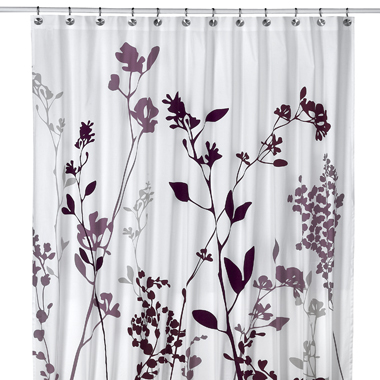
The
tan color is the one we were matching. In person it looks more tan
than it does in this picture... Here's a little peak into the closet and
also a picture of the paint tray so you can see the color better...


I
can't wait until this closet is done! Right now we only have ONE in
the whole house!!! Next we are putting in shelves then Will needs to do
the door trim and frame. :-) Getting closer!
~~~~~~~~~~~~~~~
This
is the other cube organizer we got for the Craft Room. It's from
Target and is a Closetmaid unit. The bins are also from Target as
well. Both units and all of the bins were on sale, which was great!
Emily and I found the baskets at Bath and Body Works (kinda random, I
know...) and the color matches perfectly with the dark purple crown
moulding. Also they are made out of a plastic material so they will
wipe clean... perfect for the Craft Room!


See how well they match!! :-)
~~~~~~~~~~~~~~~~
This
afternoon I painted the door trim in the Craft Room. Will is working
on chiseling out spots for the hinges in the new door as we speak.
Here's the newly painted door frame.

There
is a shadow on the door frame from the light... in person it looks
better than the picture makes it look. It took 3 coats of paint!
~~~~~~~~~~~~~~~~~
Craft Room update!
The
Craft Room is coming along nicely! On Friday we had a surprise guest,
one of Will's friends from high school that we hadn't seen since our
wedding last year. After Mike left we built a door frame, finished the
base moulding, and shoe moulding. Satruday we started to put up the
crown moulding and Will had to build a header for the door and sheetrock
and mud above the door frame. Then we went to a wedding that afternoon
as well. Yesterday we had two more surprise guests, our friends that
are getting married next weekend. Then we worked more on crown moulding
and finished sanding and mudding above the door. Two of Will's
brothers came later in the afternoon and were here for dinner. Then
Emily came to float in the lake and to watch The Bachelorette. Today we
finished mudding and sanding above the door (coat after coat after
coat!) and painted it, AND FINISHED the crown moulding! YAY!!! It's
now ready for a desk and shelves and all my craft stuff!!! :-) I am
beyond excited. I am so grateful that my husband worked so hard on it!!
I
do have to say one thing before the pictures come. I had bought some
dark purple spray paint for a different project. The other day out of
the blue I asked Will what he thought about us spray painting the crown
moulding purple. He looked at me and said, I was thinking the same
thing! So, we tried it on a scrap piece and it looked great! I am so
excited about this. It completely makes the room! I love it! The
pictures don't completely do it justice, but you get the idea. I am
going to be posting more pictures shortly! These were taken while we
were still putting it up! The first picture makes it look a little
lighter in color than it actually is...


~~~~~~~~~~~~~~~~~~~~~
More Craft Room Progess
On
Friday I painted the ceiling! :-) Then we were away for the weekend at
Will's band's gig Saturday and spent Sunday out on our friend's boat at
their camp. On our way back we stopped at Lowe's and got the baseboard
that we need. We also bought dowels and brackets to hang all of the
ribbon I found for such a great deal!
Yesterday
morning Will was able to finish up the sanding in the funky corner in
my craft room. So... yesterday afternoon I primed and painted the rest
of it! It is all painted and ready to go. It was SUCH a hot day for
painting, but it was well worth it. Emily came over white the primer
was drying and we floated out in the lake for awhile. Boy did that feel
refreshing!
I have so many ideas for this room!! I am getting awfully excited to finish it! More updates to come shortly!
Craft Room progress!
This afternoon I started painting my craft room! Here's what it looks like so far. :-)


~~~~~~~~~~~~
Craft Room progress
Now
that the wiring for the bathroom lights is done, Will was able to
Sheetrock the wall behind it in what will be my craft room. I am
excited for it to be ready to finish mudding as well. He has all of the
other walls mudded already. This room is a little bigger than it looks
in this picture. The wall to the right is the one that abuts the
bathroom where the wiring was done. Here is a picture of the current
progress of my craft room after tonight.


~~~~~~~~~~~~~~~
Light boxes for the bathroom lights
Will
and I did a lot of measuring and double checking before we found the
correct spot for the lights that will be going above the double vanity
and mirrors. As you can see, the vanity and mirrors are not installed
yet. After some careful calculations, we found the correct spots for
the electrical boxes for behind the lights. He wired them tonight as
well. This is what it looks like so far.

~~~~~~~~~~~~~~~~~~
Kitchen Window

We
have finished the window in the kitchen above the sink. First I taped
around the window trim where it meets the wall. I have to tell you, we
had been using the cheaper blue painters tape. We bought Frog Tape for
the first time and I am hooked. I am not going to use anything else,
ever again. Will used a clear polyurethane to finish the window trim.
For the first coat, he mixed half polyurethane and half mineral
spirits. Then Will continued with a second and third coat of straight
polyurethane. When the window trim was dry and finished, we added the
sunflower canvasses above it. I really like the finished product!
~~~~~~~~~~~~~~~~~

No comments:
Post a Comment
Any comments are more than welcome! :-)